Building a CI/CD pipeline for an AWS Lambda function using AWS CodePipeline
Building a CI/CD pipeline for an AWS Lambda function using AWS CodePipeline
A guide on building a CI/CD pipeline for a serverless Java application using AWS Lambda, AWS Serverless Application Model (AWS SAM), and AWS CodePipeline.
Introduction
Continuous Integration, Continuous Delivery, Continuous Deployment (CI/CD) are software development practices for producing software in short cycles between merging source code changes and updating applications. The ultimate goal of these practices is to reduce the costs, time, and risks by delivering software in small pieces.
The AWS Cloud has a complete set of tools for building CI/CD pipelines for various types of server, serverless and container applications. AWS CodePipeline is the service that automates the stages of CI/CD pipelines. Typically these stages include pulling source code using AWS CodeCommit, building artifacts using AWS CodeBuild, and deploying applications using AWS CodeDeploy.
Serverless applications in the AWS Cloud have specialized tools for building CI/CD pipelines. The AWS Serverless Application Model (AWS SAM) is a framework based on AWS CloudFormation that simplifies the development of serverless applications based on AWS Lambda.
What is CI/CD?
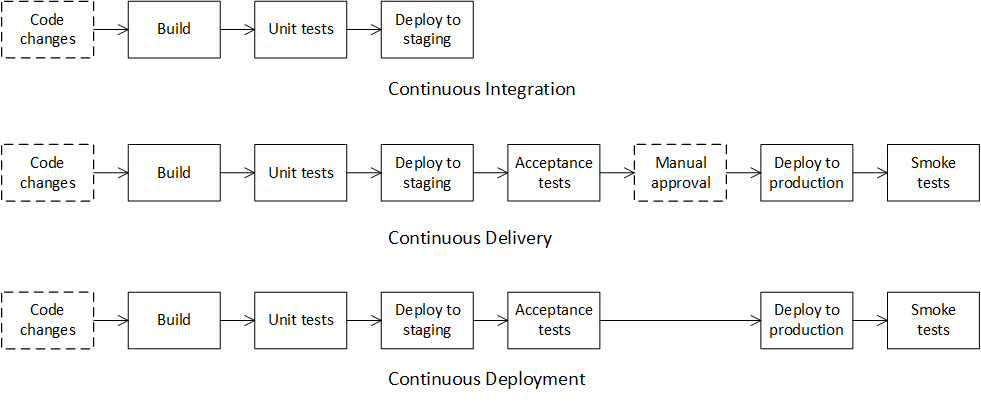
Continuous Integration
Continuous Integration is a software development practice in which developers regularly commit and push their local changes back to the shared repository (usually several times a day). By fetching and merging changes from other developers they mitigated the risk of complicated conflict resolution. Before each commit, developers can run unit tests locally on their source code as an additional check before integrating. A continuous integration service automatically builds and runs unit tests on the new source code changes to catch any errors immediately.
The goal of Continuous Integration is quick integration of changes from individual developers in the team.
Continuous Delivery
Continuous Delivery is a software development practice that extends Continuous Integration in which source code changes are automatically prepared for deployment to a production instance. After a build, the build artifact with new changes is deployed to a staging instance where advanced (integration, acceptance, load, end-to-end, etc.) tests are run. If needed, the build artifact is automatically deployed to the production instance after manual approval.
The goal of Continuous Delivery is an automated process to prepare a tested build artifact, ready for automatic deployment to a production instance.
Continuous Deployment
Continuous Deployment is a software development practice that extends Continuous Delivery in which source code changes are automatically deployed to a production instance. The difference between Continuous Delivery and Continuous Deployment is the presence of manual approval. With Continuous Delivery, deployment to production occurs automatically after manual approval. With Continuous Deployment, deployment to production occurs automatically without manual approval.
The goal of Continuous Deployment is a short cycle between fully automated applying source code changes from developers and obtaining feedback from customers.
AWS services for CI/CD
AWS CloudFormation
AWS CloudFormation is an infrastructure-as-code service that automates the creation, updating or deletion groups of related AWS and third-party resources. You describe the resources that you want to manage in a text configuration file, and AWS CloudFormation creates the resources when the configuration file is created and modifies or deletes the resources when the configuration file is updated. Using AWS CloudFormation for automated resource management makes deploying and updating resources faster and more reliable.
AWS CloudFormation has the following concepts:
An AWS CloudFormation template is a configuration file that declares the resources you want to create and configure.
An AWS CloudFormation stack is a group of resources that are created using a template as a blueprint. To create, update or delete resources in a stack, you should modify the corresponding template.
An AWS CloudFormation stack set is a group of stacks that you can create, update, or delete across multiple accounts and regions with a single operation.
An AWS CloudFormation change set is a list of proposed stack changes after submitting a new template version. You can review the change set and apply or cancel it.
AWS Serverless Application Model (AWS SAM)
AWS Serverless Application Model (AWS SAM) is an open-source framework for building serverless applications based on AWS Lambda. AWS SAM is based on AWS CloudFormation and supports all AWS CloudFormation features plus several additional macros and command-line commands. AWS SAM uses macros to expand its single resources into multiple configured AWS CloudFormation resources, which simplify the development of serverless applications. AWS SAM can run AWS Lambda functions locally in a Docker container that emulates an AWS Lambda execution environment, which allows writing integration tests for AWS Lambda functions during CI/CD pipeline.
AWS CloudFormation transforms are macros managed by AWS CloudFormation versus regular macros managed by application developers.
AWS SAM consists of the following components:
AWS SAM template specification lets you define your serverless application: AWS Lambda functions, resources, IAM permissions, and event source mappings.
AWS SAM command-line interface (AWS SAM CLI) lets you build and test serverless applications defined by AWS SAM templates.
Building a CI/CD pipeline
The serverless application
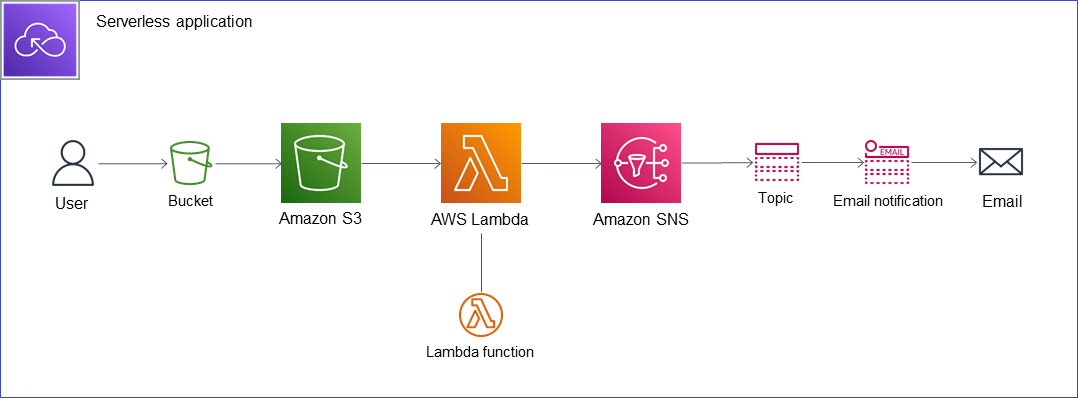
The example serverless application monitors the create and remove events in the source S3 bucket and notifies the target SNS topic with an email subscription. The compute layer of the serverless application uses a Lambda function implemented in Java. The integration layer of the serverless application uses S3 triggers to subscribe to the input events and an SNS client to write output events.
The SAM template
File template.yml contains the SAM template that defines the resources of the serverless application.
This SAM template has three sections:
- the Transform section that contains the macro AWS::Serverless-2016-10-31 that converts the SAM template into the CloudFormation template
- the Parameters section that declares the TargetEmail parameter (the email of the SNS email subscription) that you should pass to the template as parameter overrides during the deploy stage in the pipeline
- the Resources section that declares a combination of CloudFormation resources (source S3 bucket AWS::S3::Bucket and target SNS topic AWS::SNS::Topic) and SAM resource (macro AWS::Serverless::Function that during the build stage in the pipeline creates a Lambda function, IAM execution roles, and event source mappings)
AWSTemplateFormatVersion: '2010-09-09'
Transform: AWS::Serverless-2016-10-31
Parameters:
 TargetEmail:
   Type: String
Resources:
 SourceBucket:
   Type: AWS::S3::Bucket
   DeletionPolicy: Retain
   Properties:
     BucketName: !Sub "demo-ci-cd-source-bucket"
 TargetTopic:
   Type: AWS::SNS::Topic
   Properties:
     TopicName: demo-ci-cd-target-topic
     Subscription:
       - Endpoint: !Sub "${TargetEmail}"
         Protocol: email
 S3ToSNSFunction:
   Type: AWS::Serverless::Function
   Properties:
     FunctionName: demo-ci-cd-lambda-function
     Handler: demo.S3ToSnsHandler::handleRequest
     Runtime: java11
     CodeUri: build/distributions/demo-ci-cd-lambda-function.zip
     Environment:
       Variables:
         Region: !Sub "${AWS::Region}"
         TopicARN: !Sub "arn:aws:sns:${AWS::Region}:${AWS::AccountId}:demo-ci-cd-target-topic"
     AutoPublishAlias: live
     DeploymentPreference:
       Type: AllAtOnce
     Timeout: 60
     MemorySize: 512
     Policies:
       - LambdaInvokePolicy:
           FunctionName: demo-ci-cd-lambda-function
       - S3ReadPolicy:
           BucketName: !Sub "demo-ci-cd-source-bucket"
       - SNSPublishMessagePolicy:
           TopicName: demo-ci-cd-target-topic
     Events:
       S3ObjectCreated:
         Type: S3
         Properties:
           Bucket: !Ref SourceBucket
           Events: s3:ObjectCreated:*
       S3ObjectRemoved:
         Type: S3
         Properties:
           Bucket: !Ref SourceBucket
           Events: s3:ObjectRemoved:*
The environment variables Region and TopicARN, required to build an SNS client inside the Lambda function, use the pseudo parameters AWS::Region and AWS::AccountId that are predefined by CloudFormation.
The Lambda function
The class S3ToSnsHandler contains the Lambda function that is an implementation of the generic interface RequestHandler parametrized by input and output Lambda events types. The Lambda function handler receives an input S3 event as a method parameter. The Lambda function handler returns null because it sends an output SNS event by explicitly sending a request and receiving a response to the SNS client.
Lambda is an AWS computing service that lets you run event-driven serverless applications. A Lambda function is a resource that you can invoke to run your code in Lambda. A Lambda function handler is the method in your Lambda function code that processes events.
public class S3ToSnsHandler implements RequestHandler<S3Event, Void> {

   @Override
   public Void handleRequest(S3Event event, Context context) {
       List<String> messages = new ArrayList<>();
       for (S3EventNotificationRecord record: event.getRecords()) {
           String eventName = record.getEventName();
           String bucketName = record.getS3().getBucket().getName();
           String objectKey = record.getS3().getObject().getKey();

           if ("ObjectCreated:Put".equals(eventName)) {
               messages.add(String.format("Object %s is created in bucket %s",
                   objectKey, bucketName));
           }
           if ("ObjectRemoved:Delete".equals(eventName)) {
               messages.add(String.format("Object %s is removed from bucket %s",
                   objectKey, bucketName));
           }
       }

       String body = String.join("\n", messages);

       String region = System.getenv("Region");
       String topicARN = System.getenv("TopicARN");

       PublishRequest publishRequest = new PublishRequest(topicARN, body);
       PublishResult publishResult = getAmazonSNS(region).publish(publishRequest);

       return null;
   }

   AmazonSNS getAmazonSNS(String region) {
      return AmazonSNSClient.builder()
              .withRegion(Regions.fromName(region))
              .withCredentials(new DefaultAWSCredentialsProviderChain())
              .build();
   }
}
The unit test verifies the Lambda function during the build stage. To verify input, the test S3 events are loaded and deserialized from JSON text files. To verify output, the real SNS client and its request and response are replaced with mocks. The test class contains method setEnvironment based on Java Reflection hacks for passing environment variables Region and TopicARN.
public class S3ToSnsHandlerTest {

   @ParameterizedTest
   @MethodSource("methodSource")
   public void handleRequestTest(String fileName, String message) throws Exception {
       URL fileURL = getClass().getClassLoader().getResource(fileName);
       String json = Files.readString(Path.of(fileURL.toURI()), StandardCharsets.UTF_8);
       S3Event event = new S3Event(S3Event.parseJson(json).getRecords());

       Map<String, String> environment = new HashMap<>();
       environment.put("Region", "eu-north-1");
       environment.put("TopicARN", "arn:aws:sns:::target-topic");
       setEnvironment(environment);

       Context context = createMock(Context.class);
       AmazonSNS amazonSNS = createMock(AmazonSNS.class);

       S3ToSnsHandler handler = new S3ToSnsHandler() {
           @Override
           AmazonSNS getAmazonSNS(String region) {
               assertEquals("eu-north-1", region);
               return amazonSNS;
           }
       };

       Capture<PublishRequest> publishRequestCapture = newCapture();
       PublishResult publishResult = createMock(PublishResult.class);

       expect(amazonSNS.publish(capture(publishRequestCapture))).andReturn(publishResult).once();

       replay(context, amazonSNS, publishResult);
       handler.handleRequest(event, context);
       verify(context, amazonSNS, publishResult);

       PublishRequest publishRequest = publishRequestCapture.getValue();
       assertEquals(message, publishRequest.getMessage());
       assertEquals("arn:aws:sns:::target-topic", publishRequest.getTopicArn());
   }

   private static Stream<Arguments> methodSource() {
       return Stream.of(
               Arguments.of("ObjectCreatedPut.json", "Object test/key is created in bucket source-bucket"),
               Arguments.of("ObjectRemovedDelete.json", "Object test/key is removed from bucket source-bucket")
       );
   }
}
The build specification
File buildspec.yml contains the specification for the build stage in the pipeline.
version: 0.2
phases:
 install:
   runtime-versions:
     java: corretto11
 build:
   commands:
     - ./gradlew clean buildZip
     - sam package
       --template-file template.yml
       --output-template-file package.yml
       --s3-bucket demo-ci-cd-sam-bucket
artifacts:
 files:
   - package.yml
The build specification has three steps:
- install a Java runtime environment (Amazon Corretto 11)
- executing a Gradle task to build file build/distributions/demo-ci-cd-lambda-function.zip contains the Lambda function with all its dependencies
- executing command sam package to upload the zip file to the S3 bucket and convert the SAM template template.yml to the CloudFormation template package.yml
Note that the pipeline uses two different S3 buckets.
The first S3 bucket is used by SAM and stores the Lambda function with all its dependencies. This S3 bucket is specified by the –s3-bucket option. Note that command sam package also replaces the local path in the SAM template template.yml (CodeUri: build/distributions/demo-ci-cd-lambda-function.zip) with the S3 object location in the CloudFormation template package.yml (CodeUri: s3://demo-ci-cd-sam-bucket/<32-character random string>).
The second S3 bucket is used by CodePipeline to store its input and output artifacts. The template package.yml is stored in this bucket as an output artifact in the build stage and retrieved as the input artifact in the deploy stage. This bucket is specified when a CodePipeline pipeline is created and by default has the name codepipeline-<region>-<12-digit random number>.
The pipeline
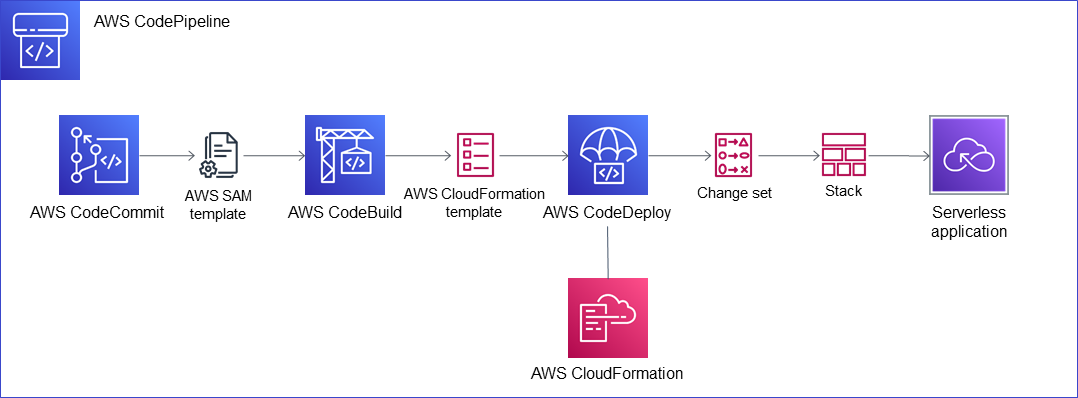
We will create a CodePipeline pipeline of three stages:
- source, which downloads the latest version of our source code from the CodeCommit repository
- build, which uses CodeBuild to build and test the source code and prepare the CloudFormation template
- deploy, which uses CloudFormation to create/update the serverless application
Repository
Go to the CodeCommit page and the ‘Create repository’ button.
Enter the following parameters and click the ‘Next’ button:
- Repository name: demo-ci-cd-lambda-function
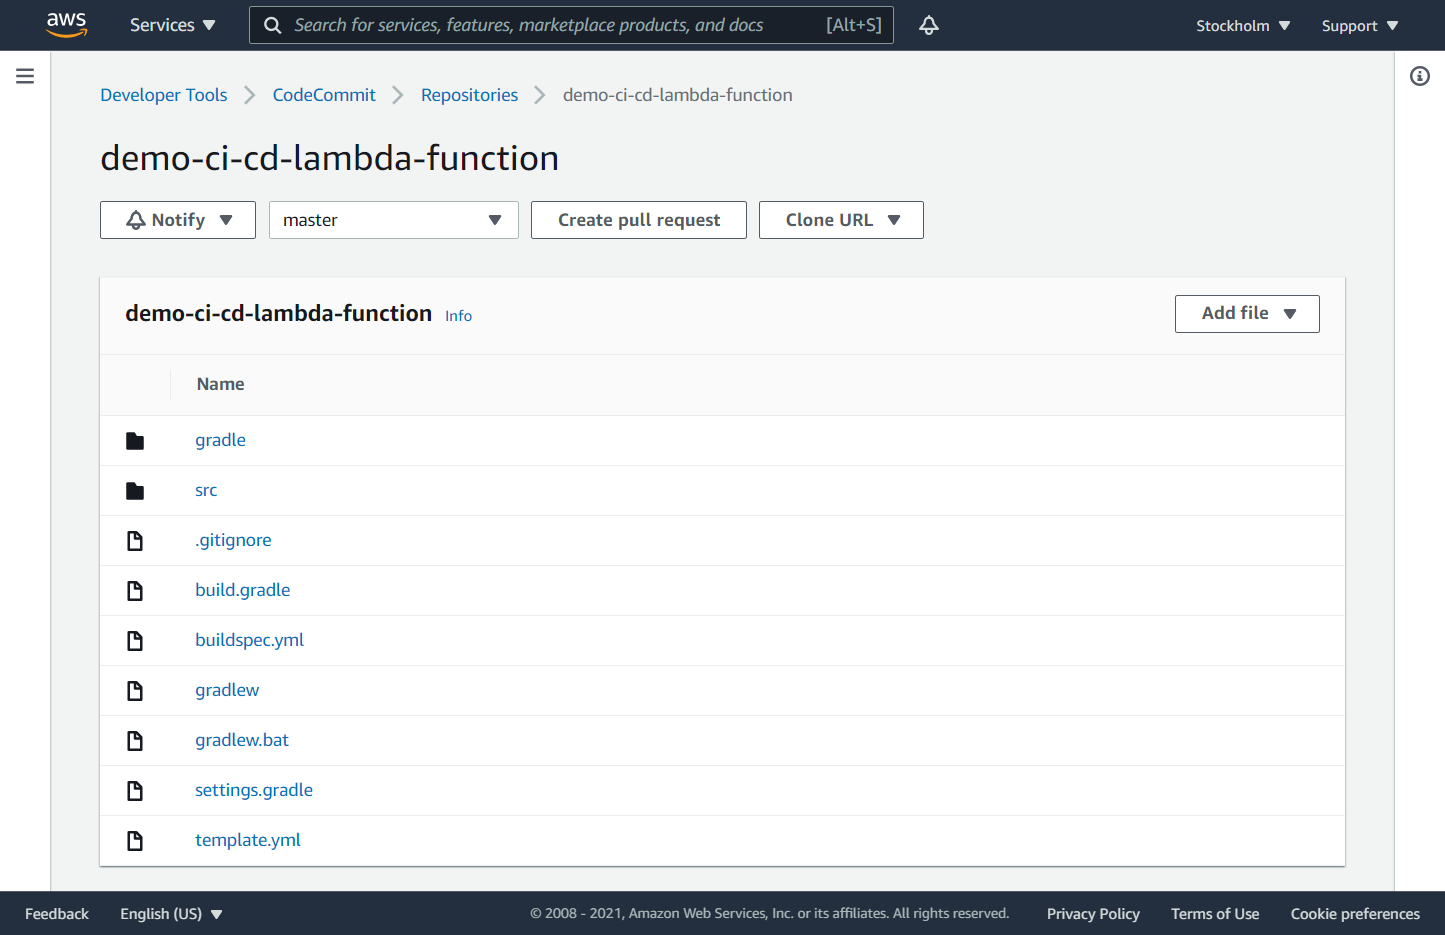
Add content to the repository with your favorable Git tool.
Set executable permission on file gradlew in the repository with Git command:
git update-index --chmod=+x gradlew
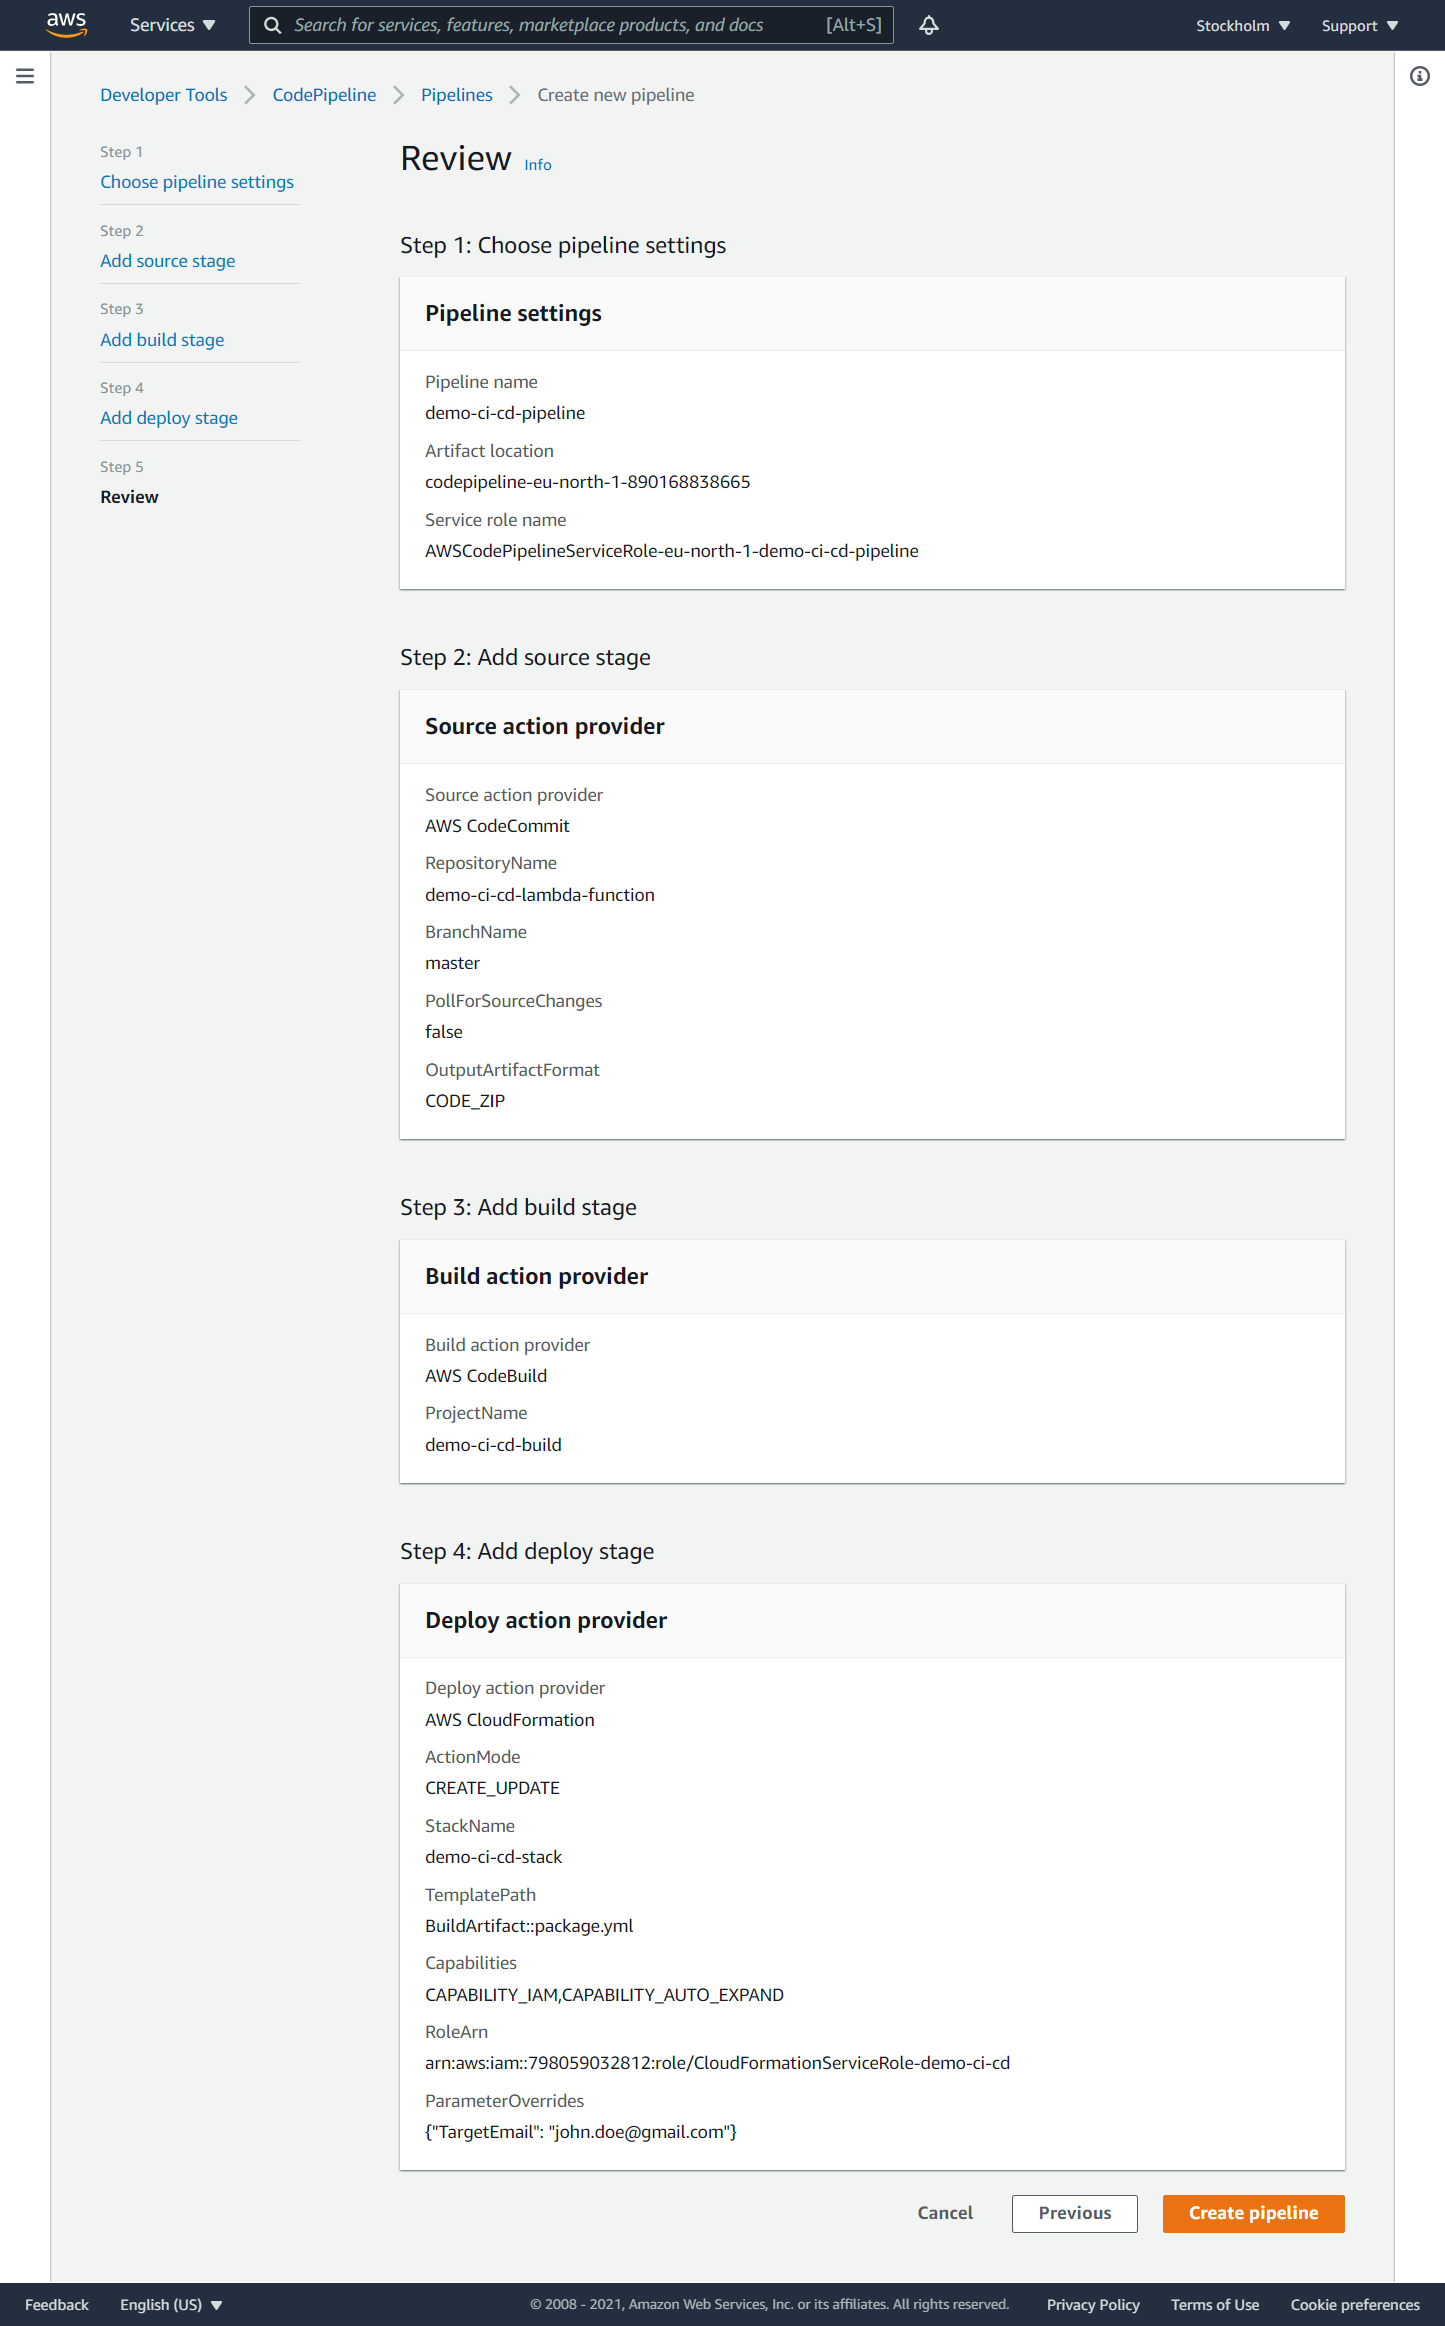
Pipeline settings
Go to the CodePipeline page and click the ‘Create pipeline’ button.
Enter the following parameters and click the ‘Next’ button:
- Pipeline name: demo-ci-cd-pipeline
- Service role: New service role
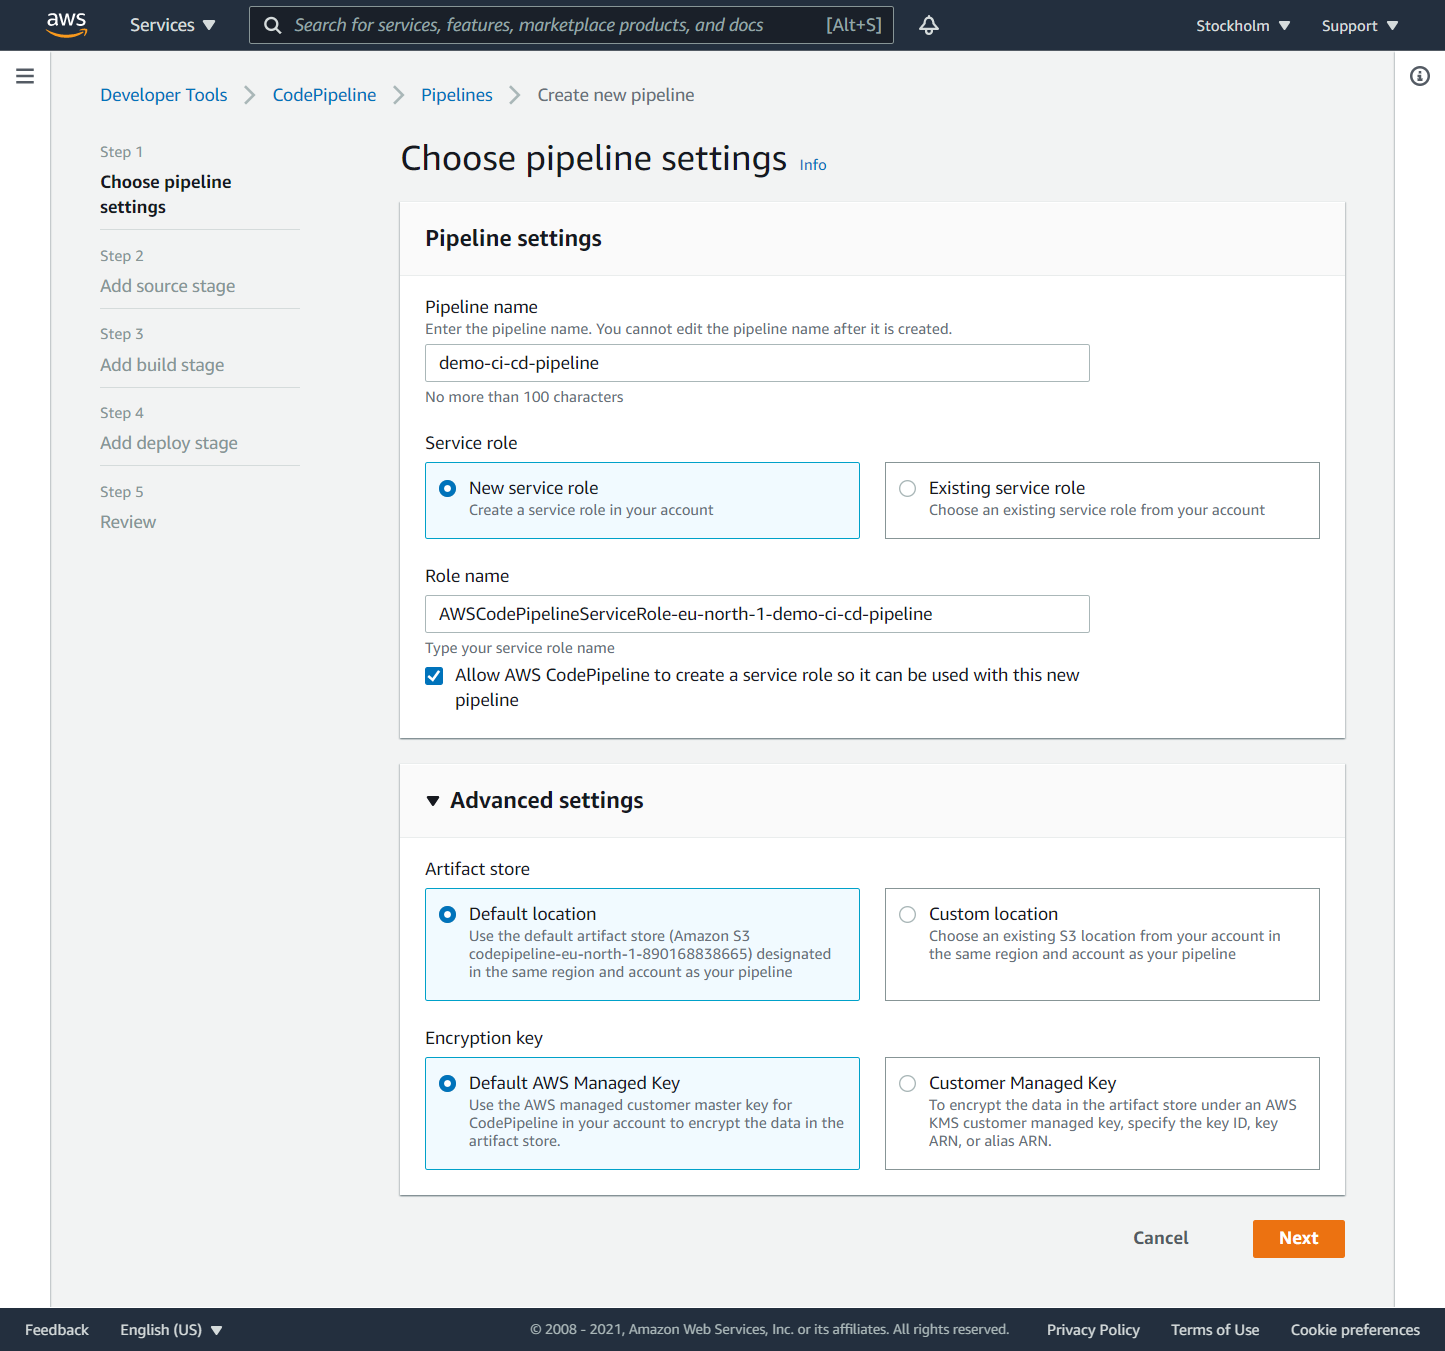
Note that in Advanced settings - Artifact store is specified the S3 bucket with the default name codepipeline-<region>-<12-digit random number> that CodePipeline uses to store its input and output artifacts between stages.
Source stage
At the ‘Add source stage’ page enter the following parameters and click the ‘Next’ button:
- Source provider: AWS CodeCommit
- Repository name: demo-ci-cd-lambda-function
- Branch name: master
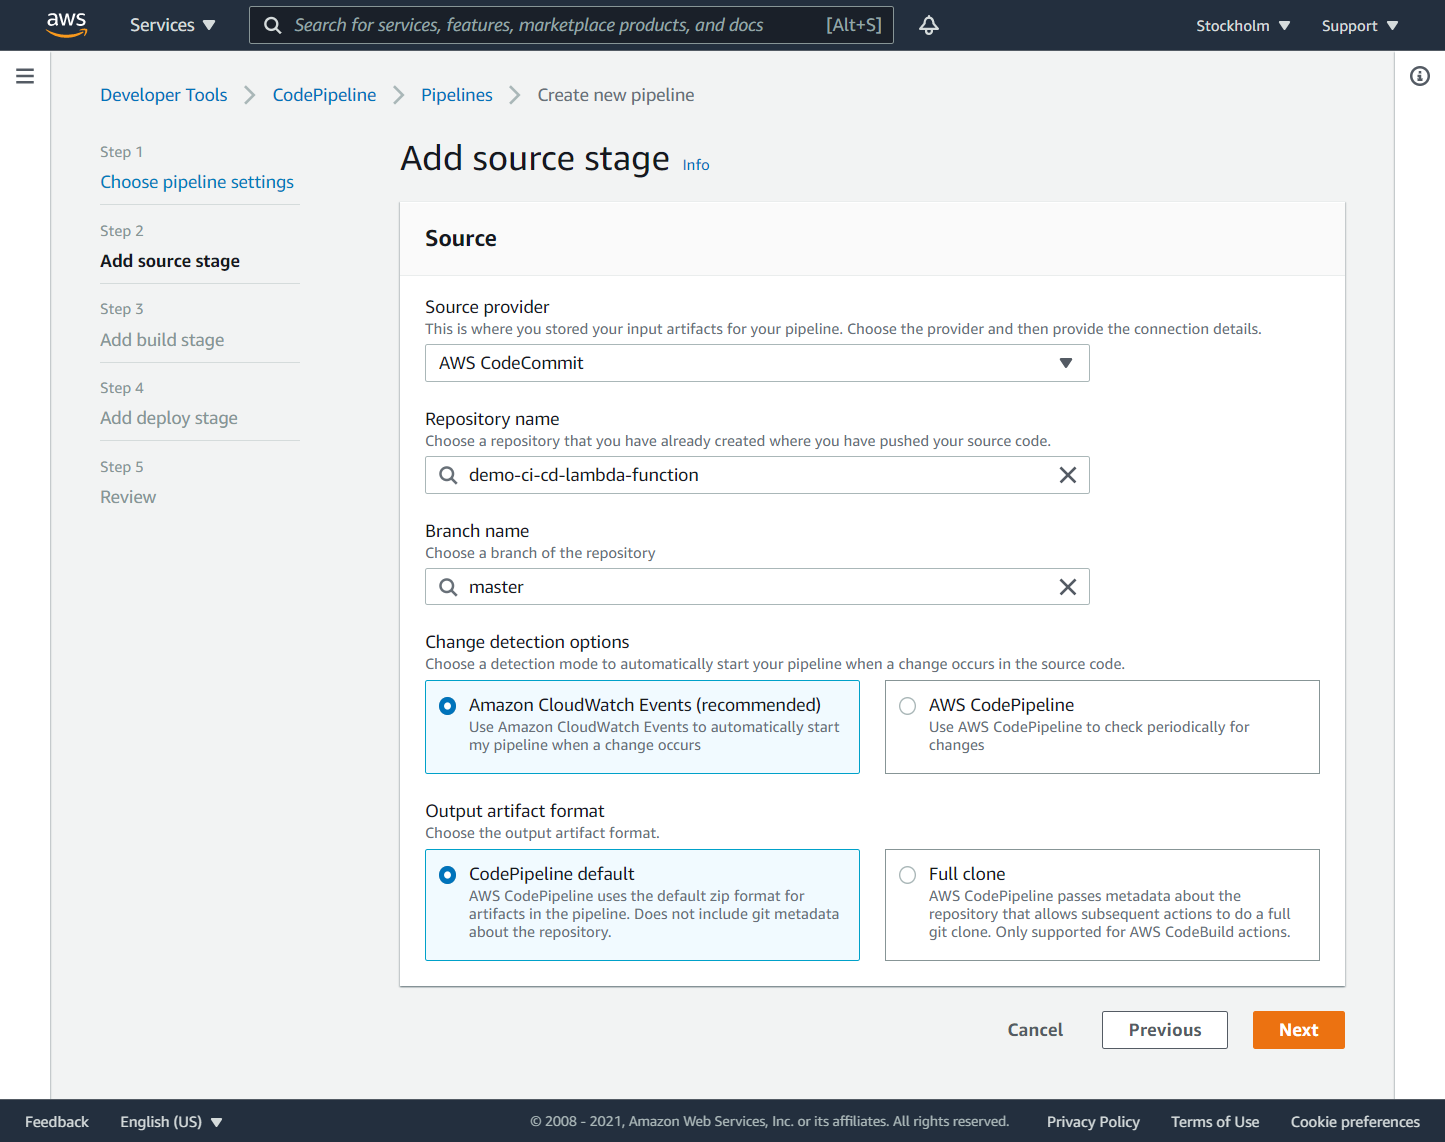
At the time of writing, the source stage supports a few source providers: AWS CodeCommit, Amazon ECR, Amazon S3, BitBucket, GitHub, and GitHub Enterprise Server.
Build
When you create a CodePipeline, you can create a CodeBuild project at the same time. For this serverless application, it is better to create the CodeBuild project separately. This will grant the CodeBuild service role permissions to access the S3 bucket demo-ci-cd-sam-bucket where your packaged Lambda function is stored.
Go to the AWS CodeBuild page and click the ‘Create build project’ button.
Enter the following parameters and click the ‘Create build project’ button:
Project configuration
- Project name: demo-ci-cd-build
Source
- Source provider: AWS CodeCommit
- Repository: demo-ci-cd-lambda-function
- Reference type: branch
- Branch: master
Environment
- Environment image: Managed image
- Operating system: Amazon Linux 2
- Runtime(s): Standard
- Image: aws/codebuild/amazonlinux2-x86_64-standard:3.0
- Image version: Always use the latest image for this runtime version
- Service role: New service role
Buildspec
- Build specifications: Use a buildspec file
Artifacts
- Type: Amazon S3
- Bucket name: demo-ci-cd-sam-bucket
- Artifacts packaging: None

Build stage
At the ‘Add build stage’ page enter the following parameters and click the ‘Next’ button:
- Build provider: AWS CodeBuild
- Region: <region>
- Project name: demo-ci-cd-build
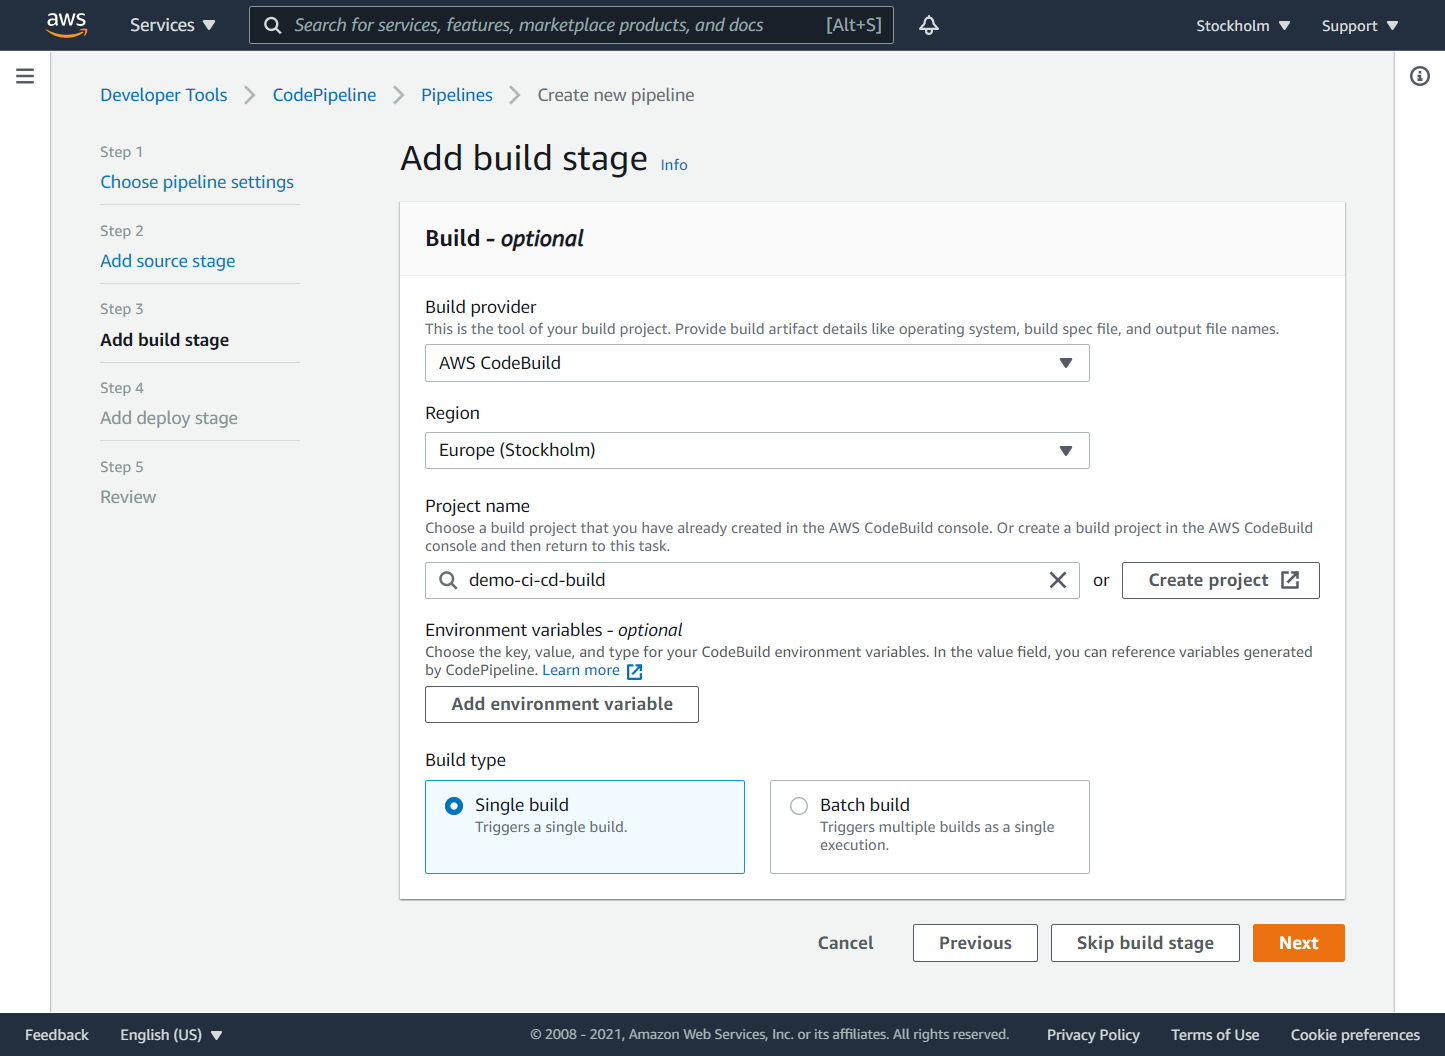
At the time of writing, the build stage supports a few build providers: AWS CodeBuild and Jenkins.
Service role for CloudFormation
You should manually create an IAM policy and an IAM service role to grant CloudFormation permissions to manage AWS resources when it creates or updates its stack during the deploy phase of the CodePipeline pipeline.
Go to the IAM page, select the ‘Policies’ page and click the ‘Create policy’ button. Click the ‘Create policy’ button, switch to the ‘JSON’ tab, and enter the following policy:
{
 "Version": "2012-10-17",
 "Statement": [
   {
     "Sid": "VisualEditor0",
     "Effect": "Allow",
     "Action": [
       "cloudformation:CreateChangeSet",
       "codedeploy:CreateApplication",
       "codedeploy:CreateDeployment",
       "codedeploy:CreateDeploymentGroup",
       "codedeploy:DeleteApplication",
       "codedeploy:DeleteDeploymentGroup",
       "codedeploy:GetDeployment",
       "codedeploy:GetDeploymentConfig",
       "codedeploy:RegisterApplicationRevision",
       "iam:AttachRolePolicy",
       "iam:CreateRole",
       "iam:DeleteRole",
       "iam:DeleteRolePolicy",
       "iam:DetachRolePolicy",
       "iam:GetRole",
       "iam:GetRolePolicy",
       "iam:PassRole",
       "iam:PutRolePolicy",
       "iam:TagRole",
       "iam:UntagRole",
       "lambda:AddPermission",
       "lambda:CreateAlias",
       "lambda:CreateFunction",
       "lambda:DeleteAlias",
       "lambda:DeleteFunction",
       "lambda:GetAlias",
       "lambda:GetFunction",
       "lambda:ListVersionsByFunction",
       "lambda:PublishVersion",
       "lambda:RemovePermission",
       "lambda:UpdateFunctionCode",
       "lambda:UpdateFunctionConfiguration",
       "s3:CreateBucket",
       "s3:DeleteBucket",
       "s3:GetObject",
       "s3:PutBucketNotification",
       "sns:CreateTopic",
       "sns:DeleteTopic",
       "sns:GetTopicAttributes",
       "sns:Publish",
       "sns:Subscribe",
       "sns:Unsubscribe"
     ],
     "Resource": "*"
   }
 ]
}
Click the ‘Next: Tags’, ‘Next: Review’ buttons. Enter the policy name: CloudFormationPolicy-demo-ci-cd. Click the ‘Create policy’ button.
Go to the IAM page, select the ‘Roles’ page and click the ‘Create role’ button. Select type of trusted entity: ‘AWS service’, Choose a use case: ‘CloudFormation’ and click the ‘Next: Permissions’ button. Find the newly created policy CloudFormationPolicy-demo-ci-cd and select it. Click the ‘Next: Tags’, ‘Next: Review’ buttons.
Enter the role name: CloudFormationServiceRole-demo-ci-cd and click the ‘Create role’ button.
Deploy stage
At the ‘Add deploy stage’ page enter the following parameters and click the ‘Next’ button:
- Deploy provider: AWS CloudFormation
- Region: <region>
- Action mode: Create or update a stack
- Stack name: demo-ci-cd-stack
- Template - Artifact name: BuildArtifact
- Template - File name: package.yml
- Capabilities: CAPABILITY_IAM, CAPABILITY_AUTO_EXPAND
- Role name: CloudFormationServiceRole-demo-ci-cd
- Advanced - Parameter overrides: {“TargetEmail”: “<email>”}
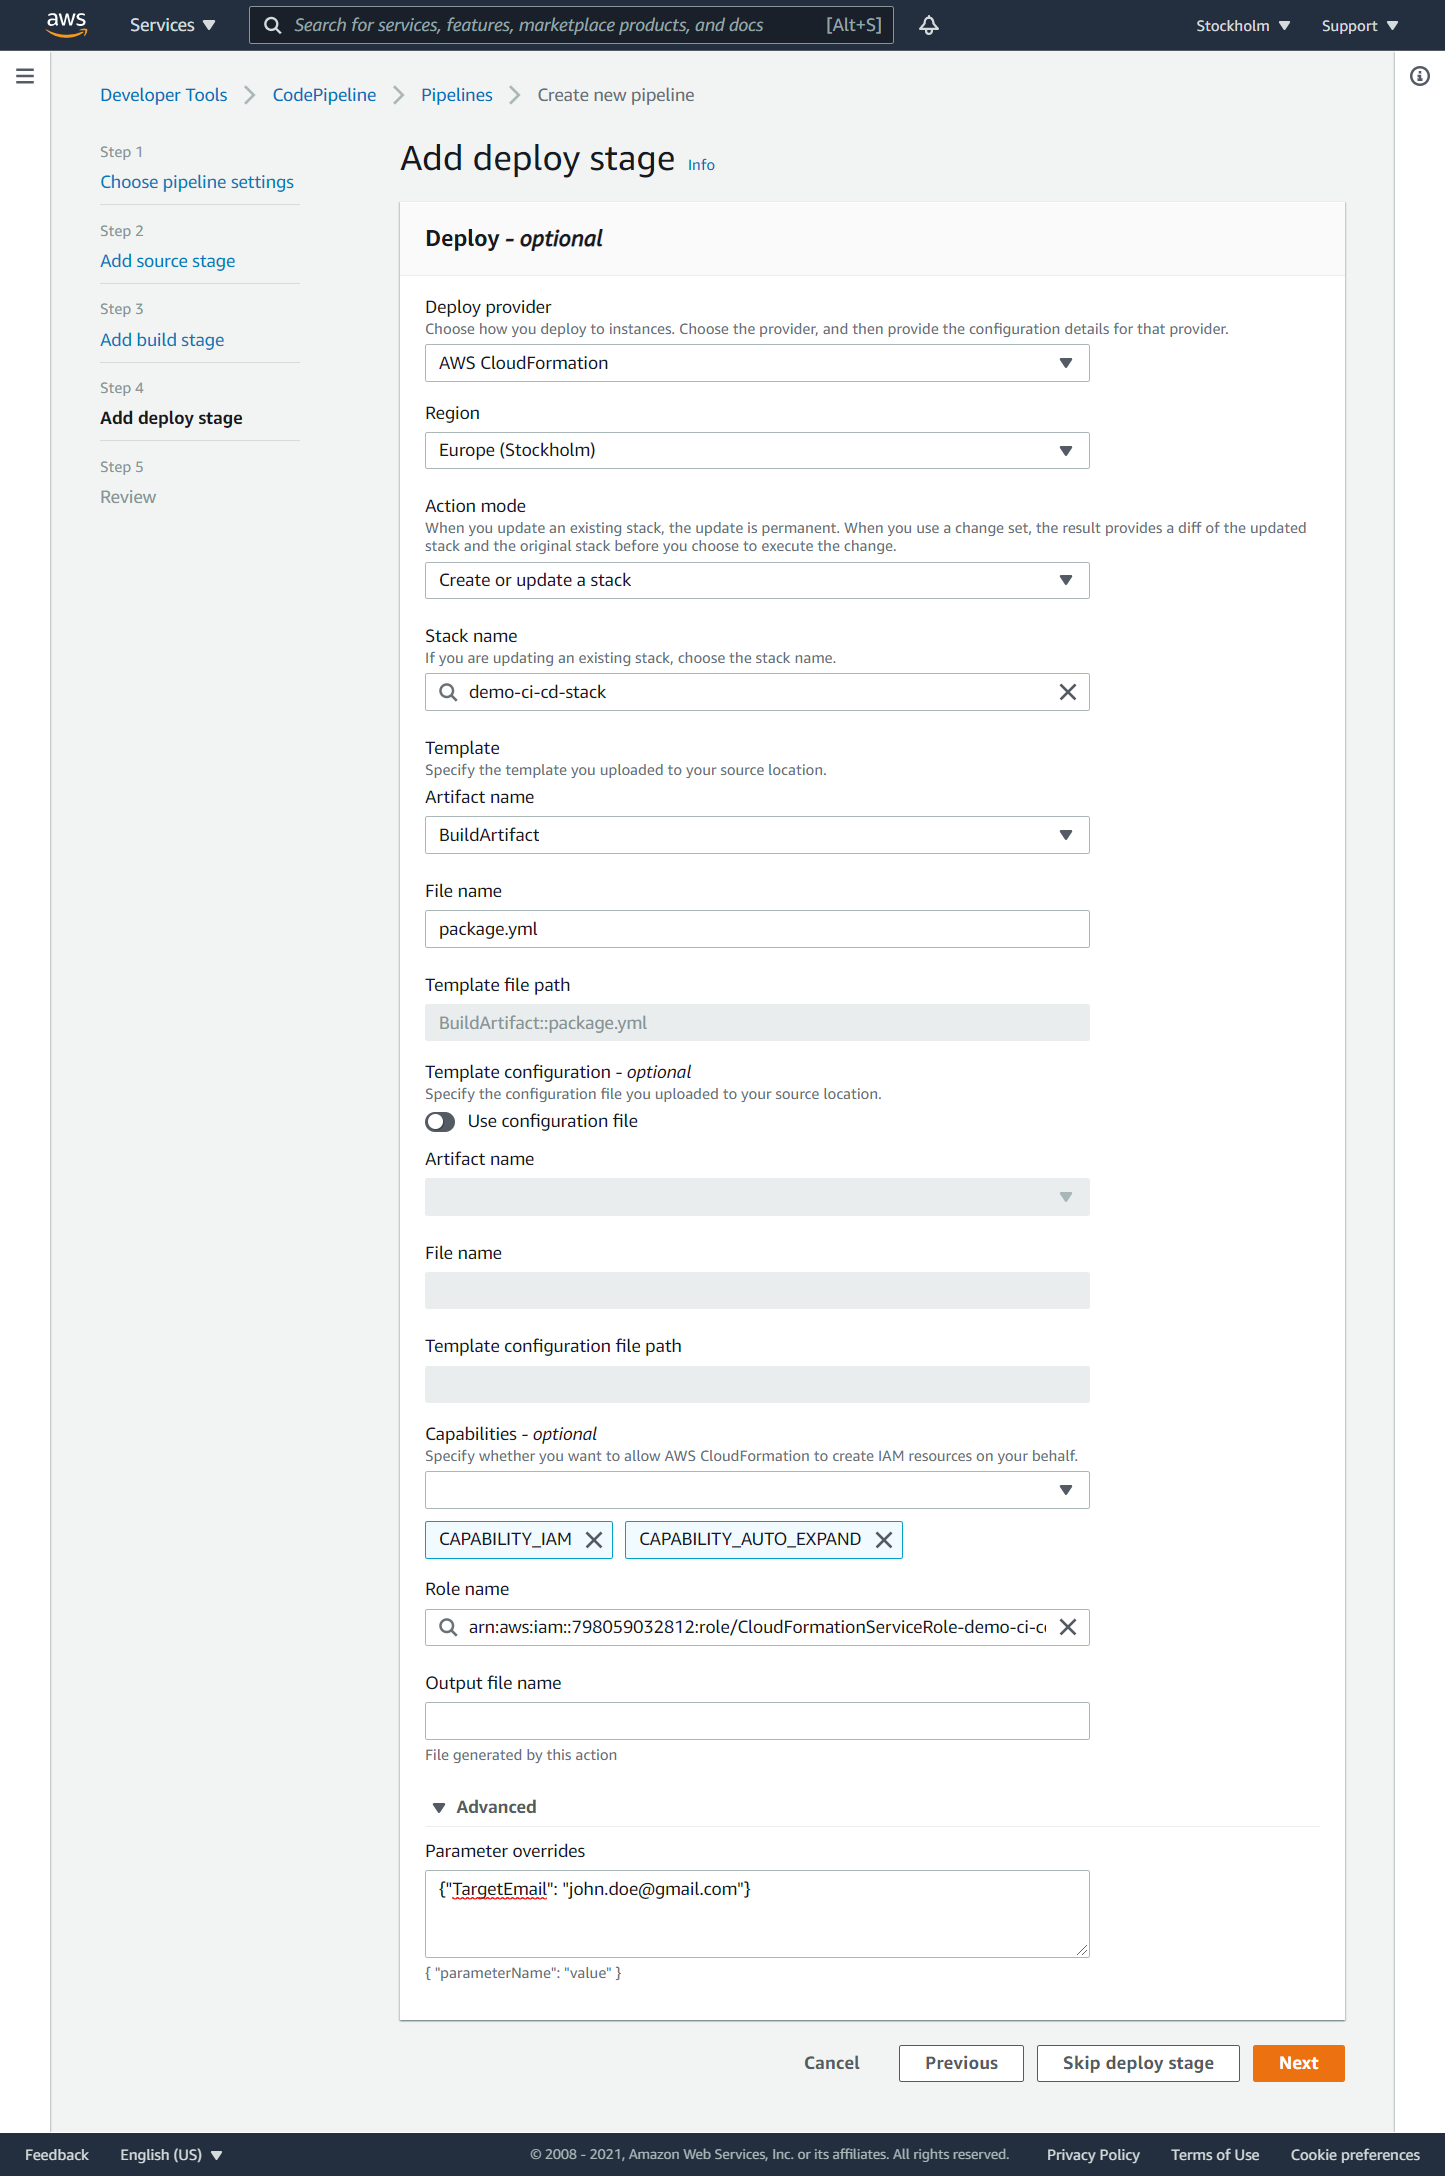
At the time of writing, the deploy stage supports the following deploy providers: AWS AppConfig, AWS CloudFormation, AWS CloudFormation StackSet, AWS CodeDeploy, AWS Elastic Beanstalk, AWS OpsWorks Stacks, AWS Service Catalog, Amazon ECS, Amazon ECS (Blue/Green), and Amazon S3.
Capability CAPABILITY_IAM allows CloudFormation to create IAM resources (policies, roles, users, etc.). Since we do not specify the exact names of these IAM resources, we use capability CAPABILITY_IAM instead of capability CAPABILITY_NAMED_IAM.
Capability CAPABILITY_AUTO_EXPAND is required when a template contains macros. SAM templates contain transform AWS::Serverless, which is a macro provided by CloudFormation. This macro takes a SAM template and transforms it into a compliant CloudFormation template.
Review
Review the pipeline and click the ‘Create pipeline’ button.
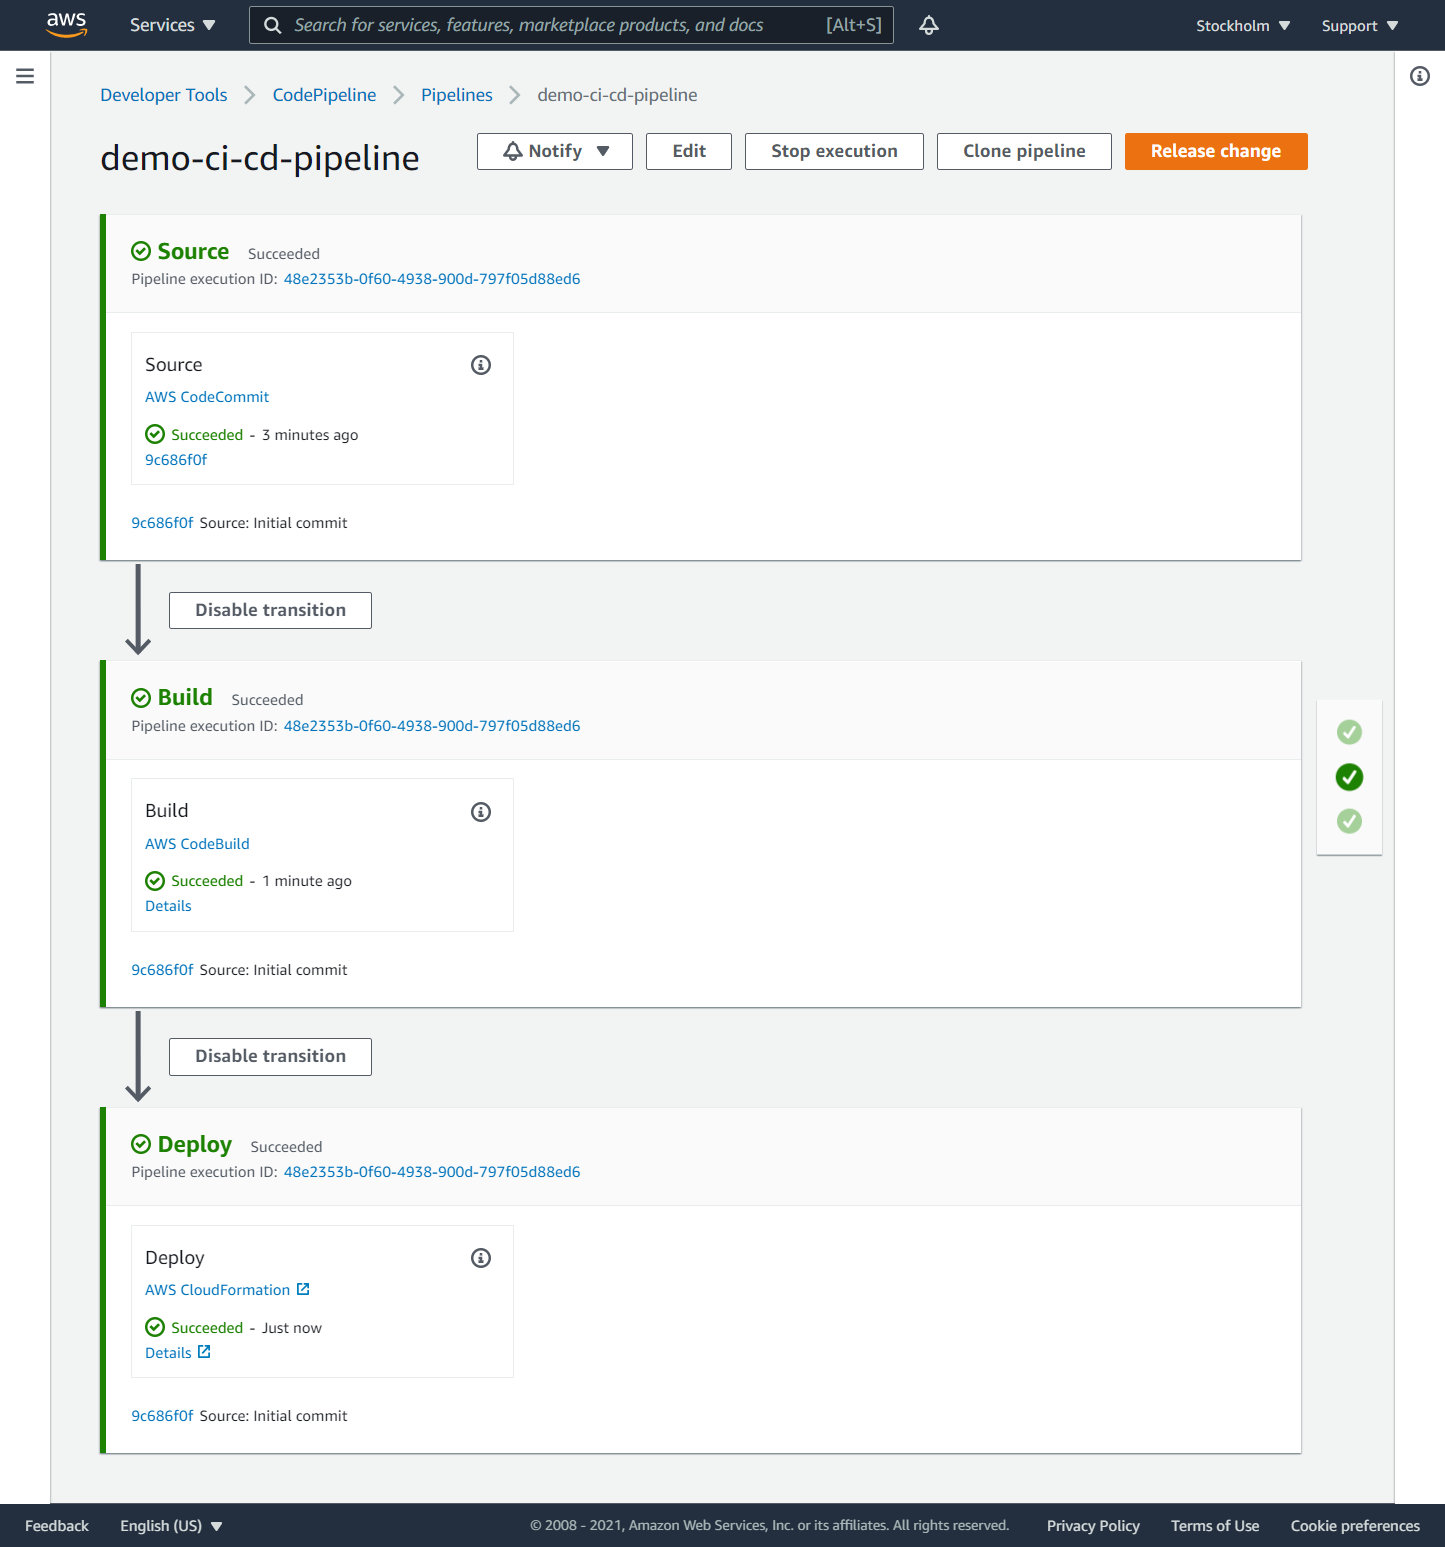
Once you create the pipeline, it will start running. If the execution succeeds, the serverless application is created. If the execution fails, you can identify the source of the failure by clicking the ‘Details’ link on the failed stage. Once you fix the failure, you can continue to run the pipeline from the failed stage.
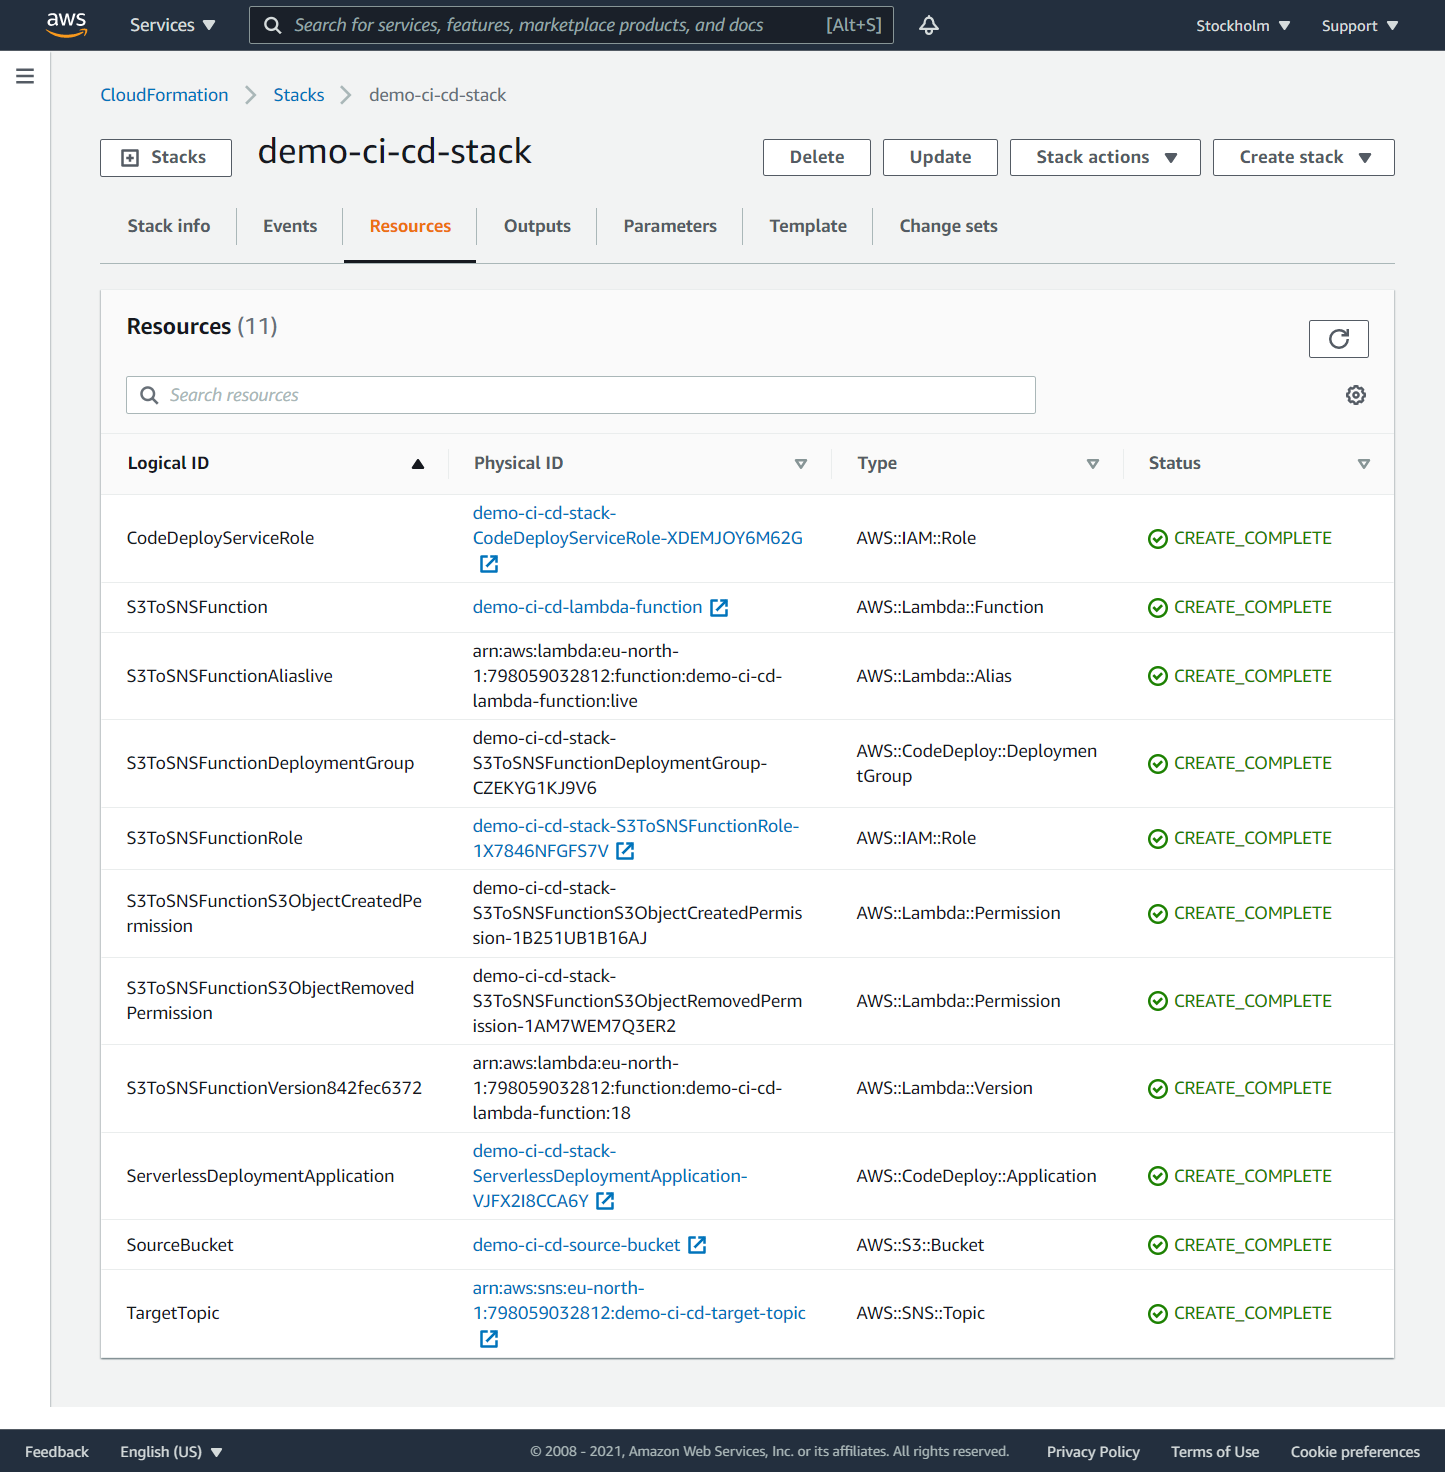
On the ‘CloudFormation - Stacks’ page you can see what resources are created from the CloudFormation template after the pipeline has finished.
Running a CI/CD pipeline
Test the Lambda function
You can test the Lambda function in a local instance. Command sam local generate-event generates sample events from various event sources. Command sam local invoke invokes a local Lambda function once with the given event and quits after invocation completes.
The following piped command prepares the S3 put event to stdin and invokes the Lambda function with this event in a Docker container that emulates a Lambda execution environment.
sam local generate-event s3 put --bucket source-bucket --key test/key | sam local invoke -e - demo-ci-cd-lambda-function
If the call succeeds, the target SNS topic will send emails to the subscribed mailbox.
At the time of writing, AWS SAM does not support passing pseudo parameters into the local execution environment.
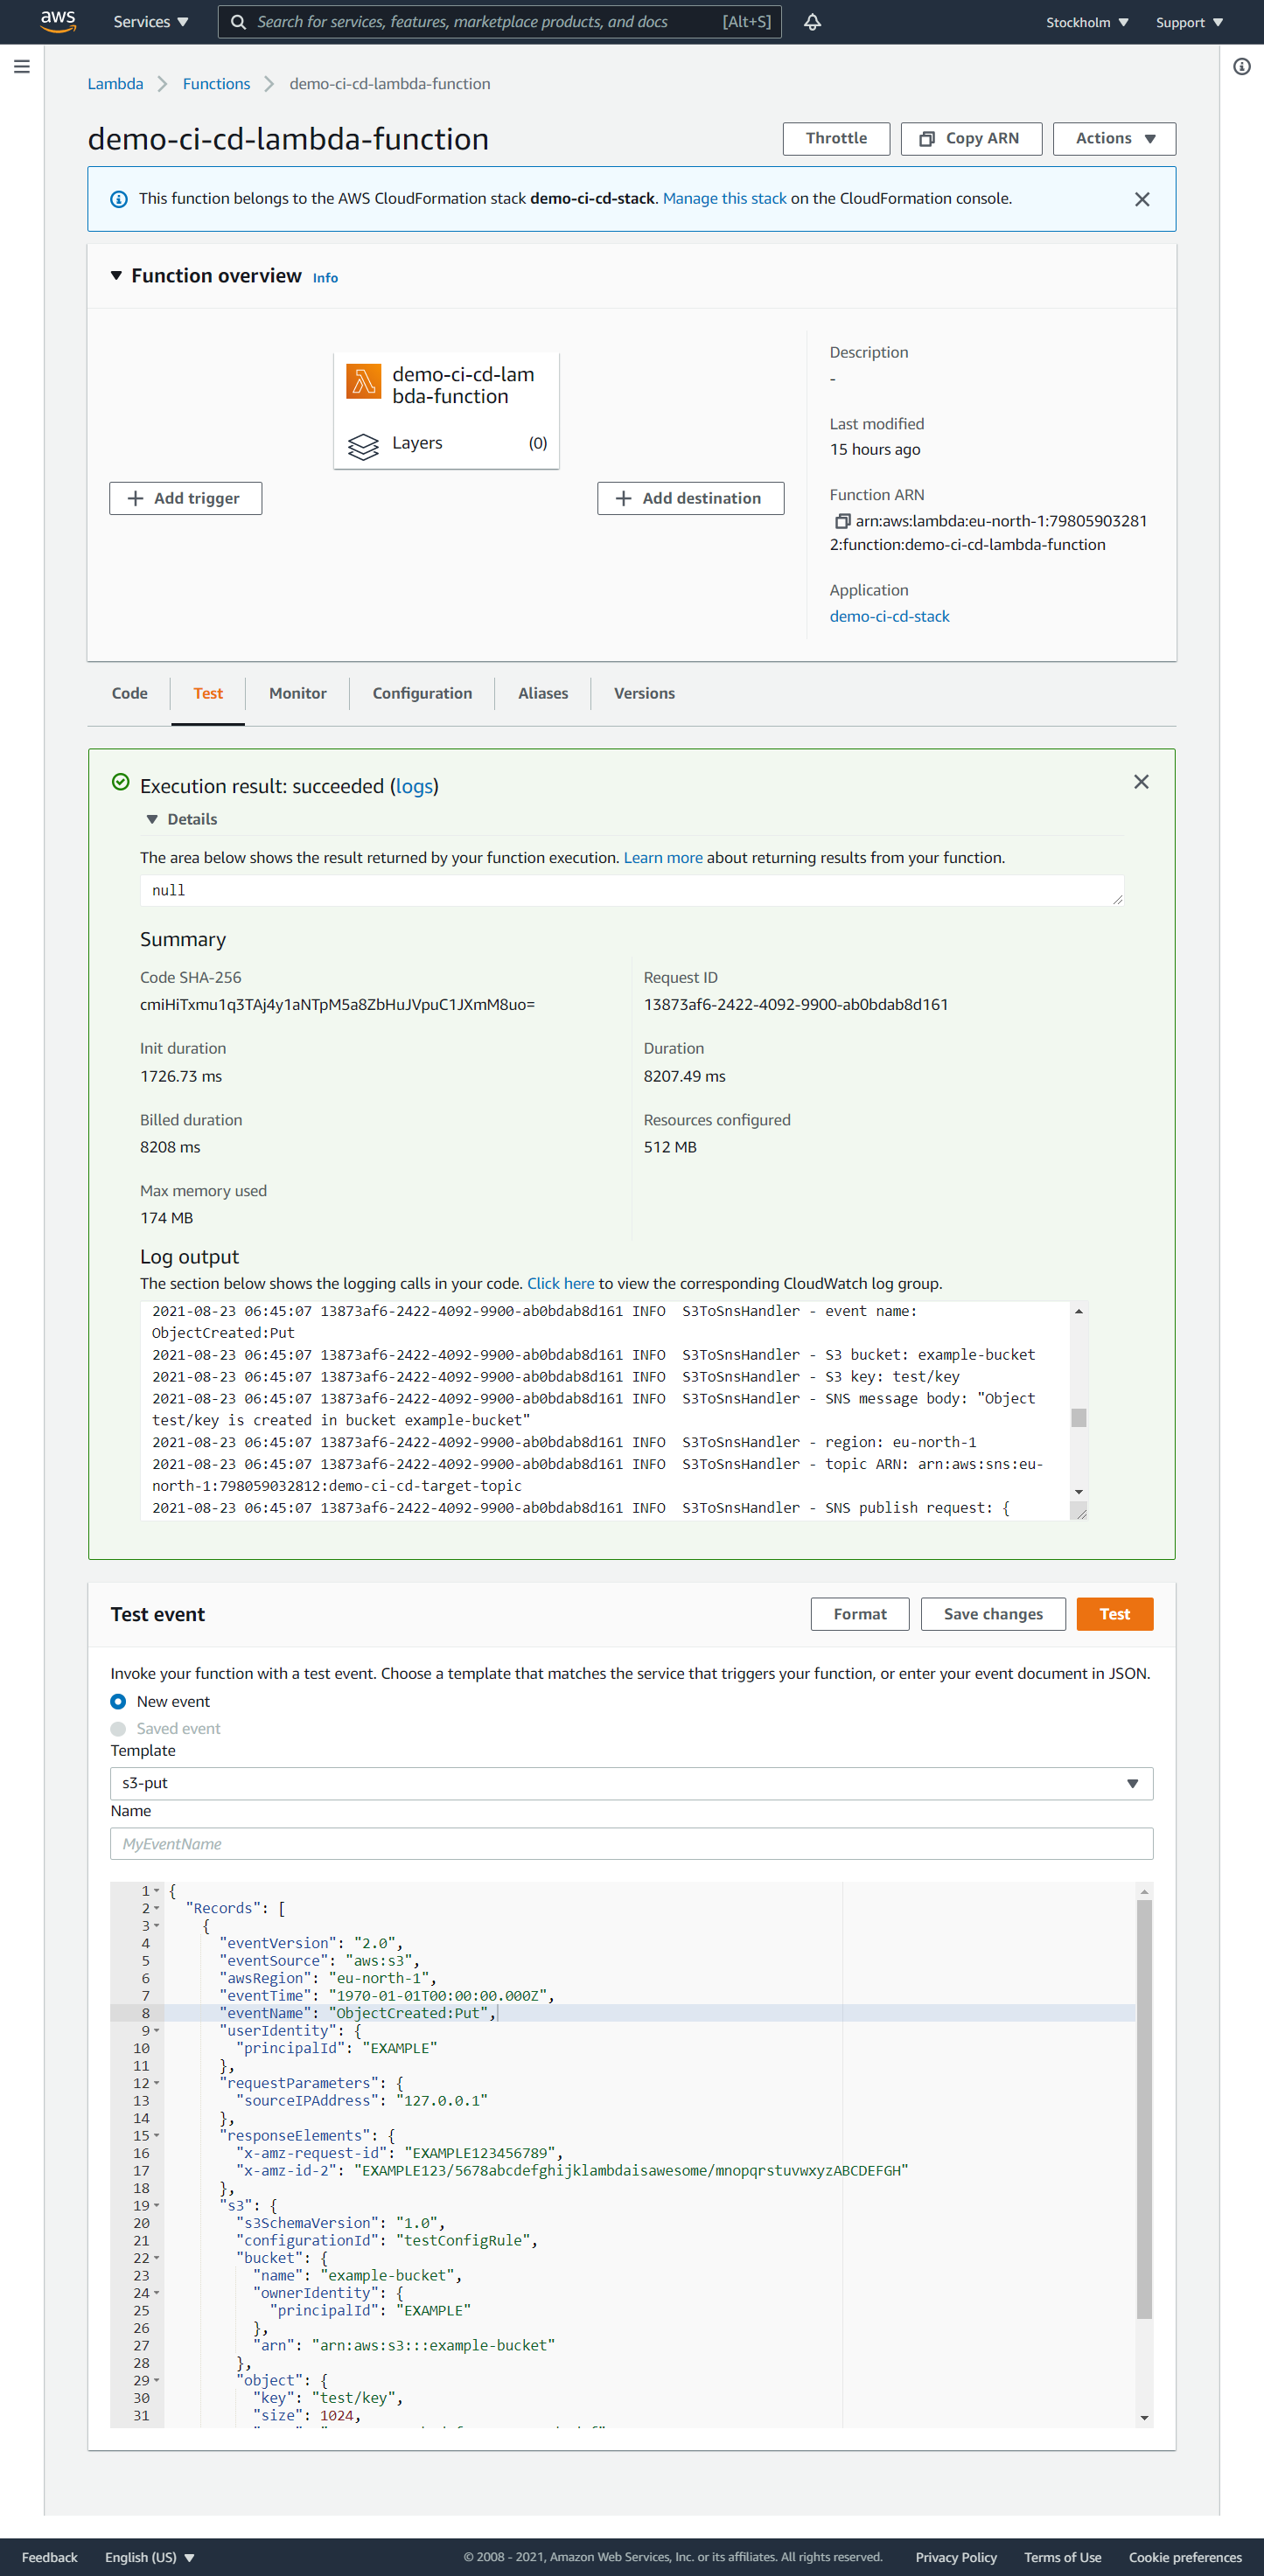
You also can test the Lambda function in the AWS Cloud. Go to the ‘Lambda function’ page and select the ‘Test’ tab. Select the test event ‘Amazon S3 Put’ or ‘Amazon S3 delete’, and click the ‘Test’ button. After the call succeeds or fails, click the ‘Logs’ link and view the logs in the CloudWatch log stream. If the call succeeds, the target SNS topic will send emails to the subscribed mailbox too.
Run the serverless application
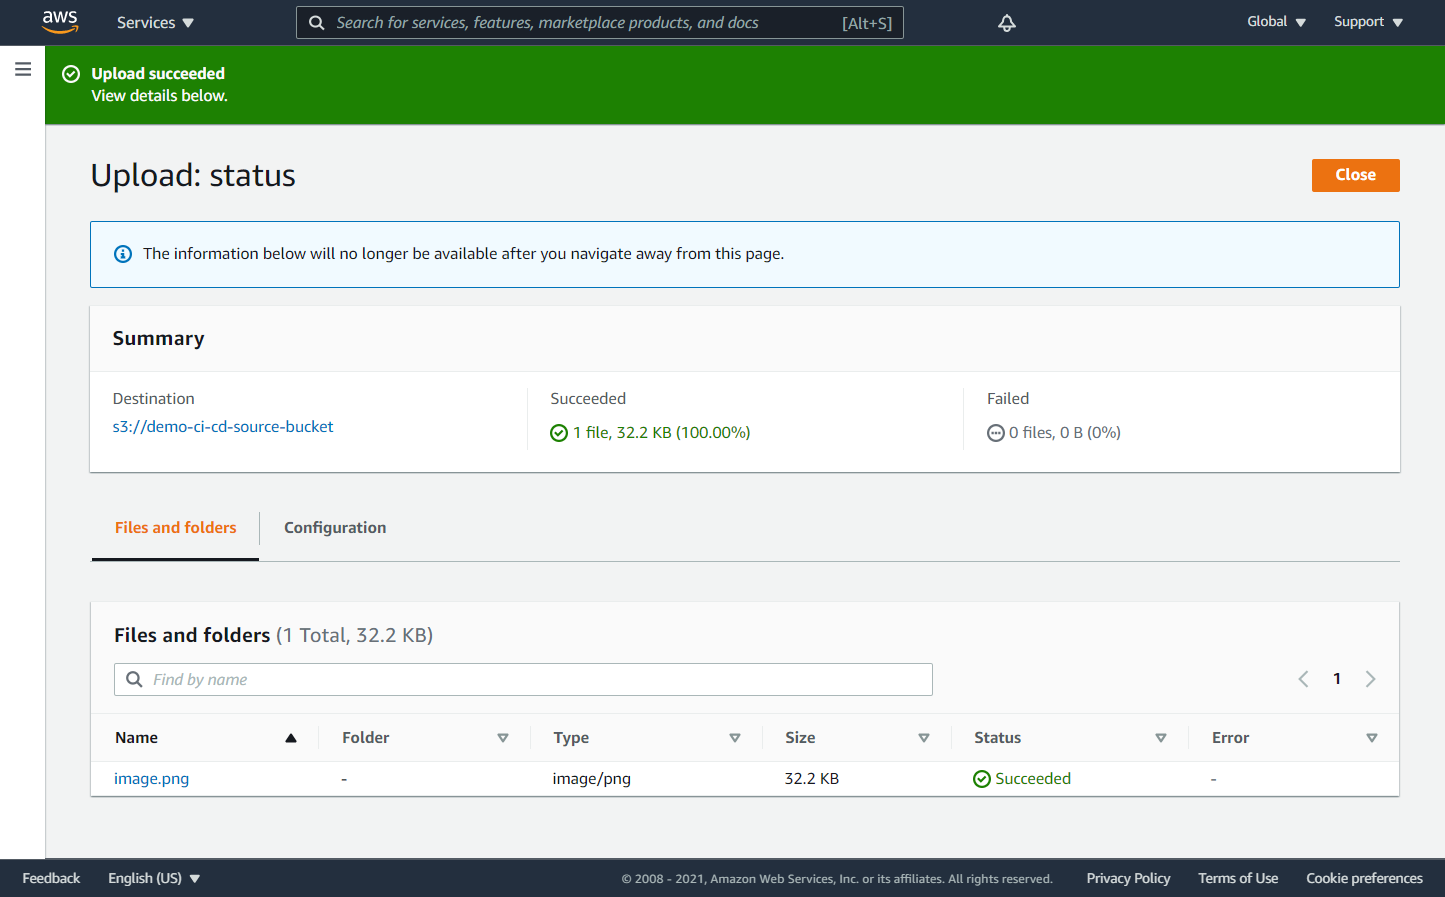
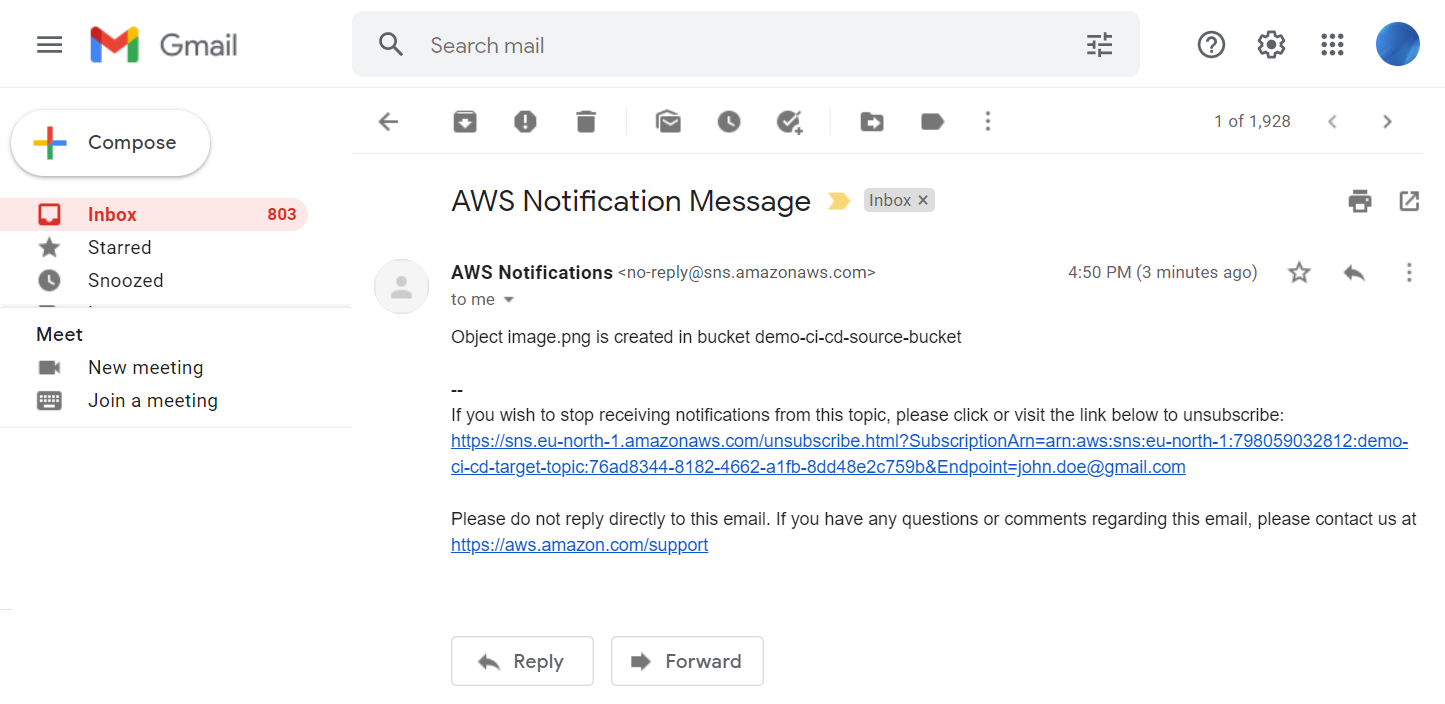
You can now add or remove objects in the source S3 bucket and see that the target SNS target topic sends emails into the subscribed mailbox.
Modify the serverless application
You can now modify the serverless application, commit and push some changes. This will automatically start the pipeline that, if successful, will deploy the new version of the serverless application.
Conclusion
AWS has a comprehensive set of services for building CI/CD pipelines for various types of AWS applications. You can set up a pipeline that monitors changes in a source control service and automatically creates or updates the application.
If you want to start with a CI/CD pipeline, try to start with the following steps:
- make build and deployment automated and fast
- pull changes of other developers as often as possible (at least once a day)
- run automated tests locally before pushing the changes to the remote server
- write automated tests for each new feature, refactoring, or bug fix
- keep the quality of the automated tests the same as the quality of the code
- cover a significant part of the code with automated tests (at least 75%)
- fix the build as soon as it is broken (at least on the same day)
- be familiar with feature flags to merge incomplete features into the main branch
- make the development instance as close as possible to the production instance
Complete code examples are available in the GitHub repository.